From JAPAN to the world, For your BEST design, We provide HIGH QUALITY industrial products & the BEST SOLUTION!


- HOME
- News Topics
- ++NEW++Vibration Resistant Eccentric Lock Washer “SWAS-EW” (NBK brand)
News Topics
++NEW++Vibration Resistant Eccentric Lock Washer “SWAS-EW” (NBK brand)
2017.2.9
Vibration Resistant
Eccentric Lock Washer™
"SWAS-EW"
<<Material/Finish>>
| SWAS-EW | |
| Receiving Washer | SUS304 |
| Eccentric Washer | SUS304 |
<<Application>>
Vibration resistant treatment
<<Characteristics>>
- Vibration resistant treatment effect can be achieved simply by using commercially available hexagon nuts.
- Hexagon nuts can be tightened by hand until tightening force applies, for simple mounting.
- Use the receiving washer and eccentric washer as a set.
- Passes NAS-type vibration tests (NAS3350).
- Vibration resistant treatment effect has also been confirmed with the Junker test.
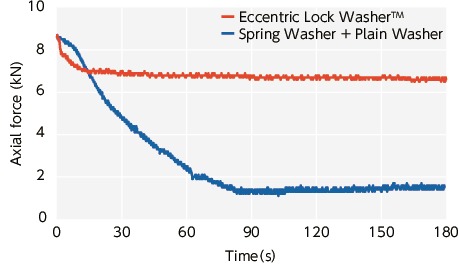
Test conditions
Bolt size: M10-40
Distance between washer surfaces: 24mm
Amplitude: ±0.43mm
Vibration: 3.3Hz
Test time: 180 sec
<<Precautions for Use>>
- Dedicated for hexagon nuts. Do not use on head side of hexagon head bolts.
- After tightening, use bolts with length sufficient to ensure screw thread pitches of 3 or more extending beyond the hexagon nuts.
- Do not use with other washers such as plain washers.
- When using half-thread bolts, confirm that the eccentric washer is in the screw thread part.
- Bolt damage may ensue due to product properties.
<<Product List>>
| Part Number | Nominal | D | d | B | C | t1 | t2 | t | Reference tightening torque | Qty per pack | Mass |
| (N・m) | (g) | ||||||||||
| SWAS-6-EW | 6 | 12 | 6.05 | 11.6 | 13.3 | 2.65 | 2.9 | 3.9 | 10 | 100 | 1.5 |
| SWAS-8-EW | 8 | 17 | 8.1 | 15 | 17.3 | 3.3 | 3.9 | 5.1 | 28 | 100 | 3.5 |
| SWAS-10-EW | 10 | 21 | 10.2 | 19.8 | 22.8 | 4.05 | 4.8 | 6.2 | 55 | 100 | 7.2 |
| SWAS-12-EW | 12 | 24 | 12.2 | 22 | 25.4 | 4.5 | 6 | 7.5 | 90 | 100 | 11 |
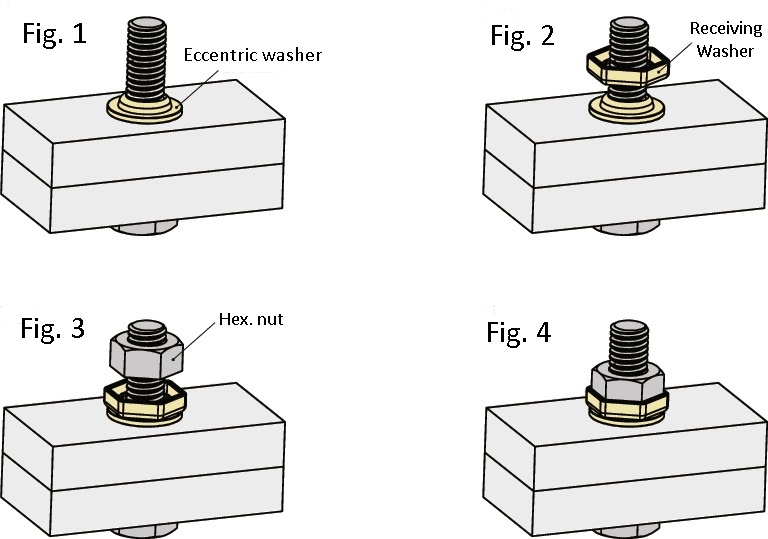
<<Inserting method>>
- Please set the convex side of the eccentric washer upward. (Fig.1)
- Please set the concave of the receiving washer upward. (Fig. 2)
- Please tighten till Hex. nut hits lightly the receiving washer. (Fig. 3)
- Please tighten after your confirming that receiving washer and Hex. Nut are fitting together. (Fig. 4)